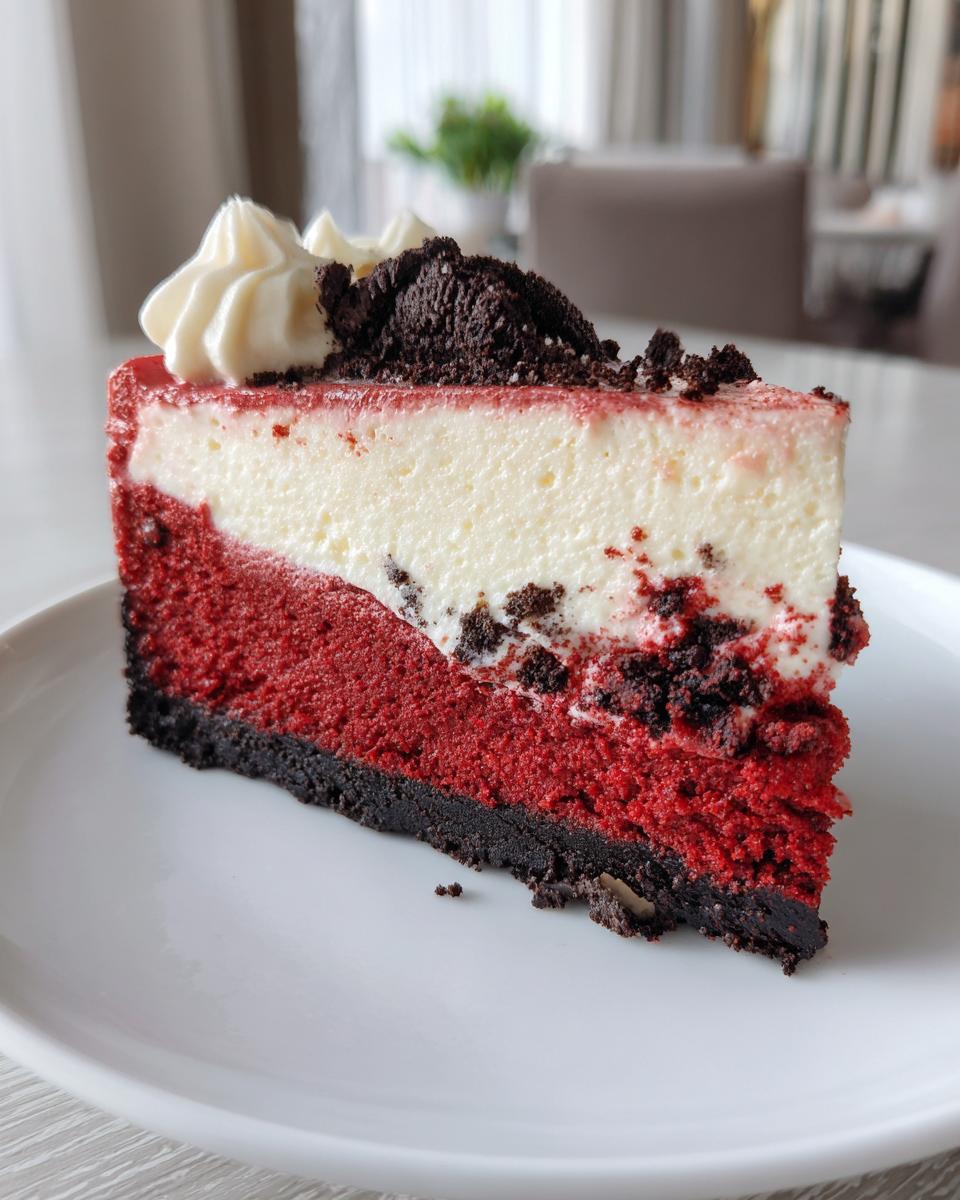
Oh my goodness, get ready, because we are diving headfirst into the most ridiculously delicious dessert you’ll ever make: my Red Velvet Oreo Cheesecake! Seriously, this isn’t just a cheesecake; it’s a celebration in every single bite. Imagine that classic, velvety red velvet cake flavor, but then BAM! It’s all swirled into a creamy, dreamy cheesecake, packed with crunchy Oreo pieces, and sitting on a perfect chocolate cookie crust. Top it all off with a cloud of tangy cream cheese frosting? Pure bliss.
The first time I tried to tackle a Red Velvet Oreo Cheesecake, I thought, “This is going to be a project!” And it was, but in the best possible way. I messed up a few times, sure, but each attempt taught me something new, honing my skills until I landed on *this* recipe. It’s the one I pull out for every special occasion, and it never, ever disappoints. This recipe takes those familiar, comforting flavors and elevates them into something truly spectacular. You get the rich cocoa, the subtle tang, the crunch of the cookies, and that unbelievably smooth, creamy texture. It’s everything you want in a dessert, and then some!
Why You’ll Love This Red Velvet Oreo Cheesecake
Trust me, this isn’t just *any* Red Velvet Oreo Cheesecake recipe. This is THE one. It hits all the right notes, giving you that incredible balance of rich, tangy, and sweet. You’ll absolutely adore how beautifully it comes together, and the compliments? Oh, they’ll be endless! It’s got that dramatic look that just screams “special occasion,” but it’s surprisingly simple to put together. Plus, it’s a total crowd-pleaser, perfect for impressing everyone without breaking a sweat.
- Unforgettable Flavor: The perfect blend of classic red velvet and creamy cheesecake.
- Texture Heaven: Smooth, rich cheesecake studded with crunchy Oreo pieces on a crisp crust.
- Showstopper Looks: That vibrant red and white contrast is just gorgeous!
- Easy to Master: My step-by-step guide makes it totally doable, even for beginners.
The Ultimate Red Velvet Oreo Cheesecake Experience
What makes *this* Red Velvet Oreo Cheesecake truly stand out? It’s the way every single element perfectly complements the others. You get that deep, subtle cocoa from the red velvet, the irresistible tang from the cream cheese, and then those delightful, crunchy bites of Oreo throughout. It’s a symphony of textures and flavors that’ll have everyone asking for your secret!
Essential Tools for Your Red Velvet Oreo Cheesecake
Okay, before we get our hands messy with all that deliciousness, let’s talk tools! You don’t need a professional kitchen, but having the right gear really does make crafting this Red Velvet Oreo Cheesecake so much smoother and more fun. Think of these as your trusty sidekicks in the quest for cheesecake perfection. I’ve broken down exactly what you’ll need to make sure your cheesecake comes out looking and tasting like a dream!
Must-Have Equipment for a Perfect Red Velvet Oreo Cheesecake
For this Red Velvet Oreo Cheesecake, a good 9-inch springform pan is non-negotiable – it’s how we get those gorgeous, intact sides! A stand mixer or a powerful hand mixer will save your arms when beating that cream cheese, and a sturdy cooling rack is essential for letting your cheesecake cool down properly and avoid a soggy bottom. Trust me, these items are your best friends here!
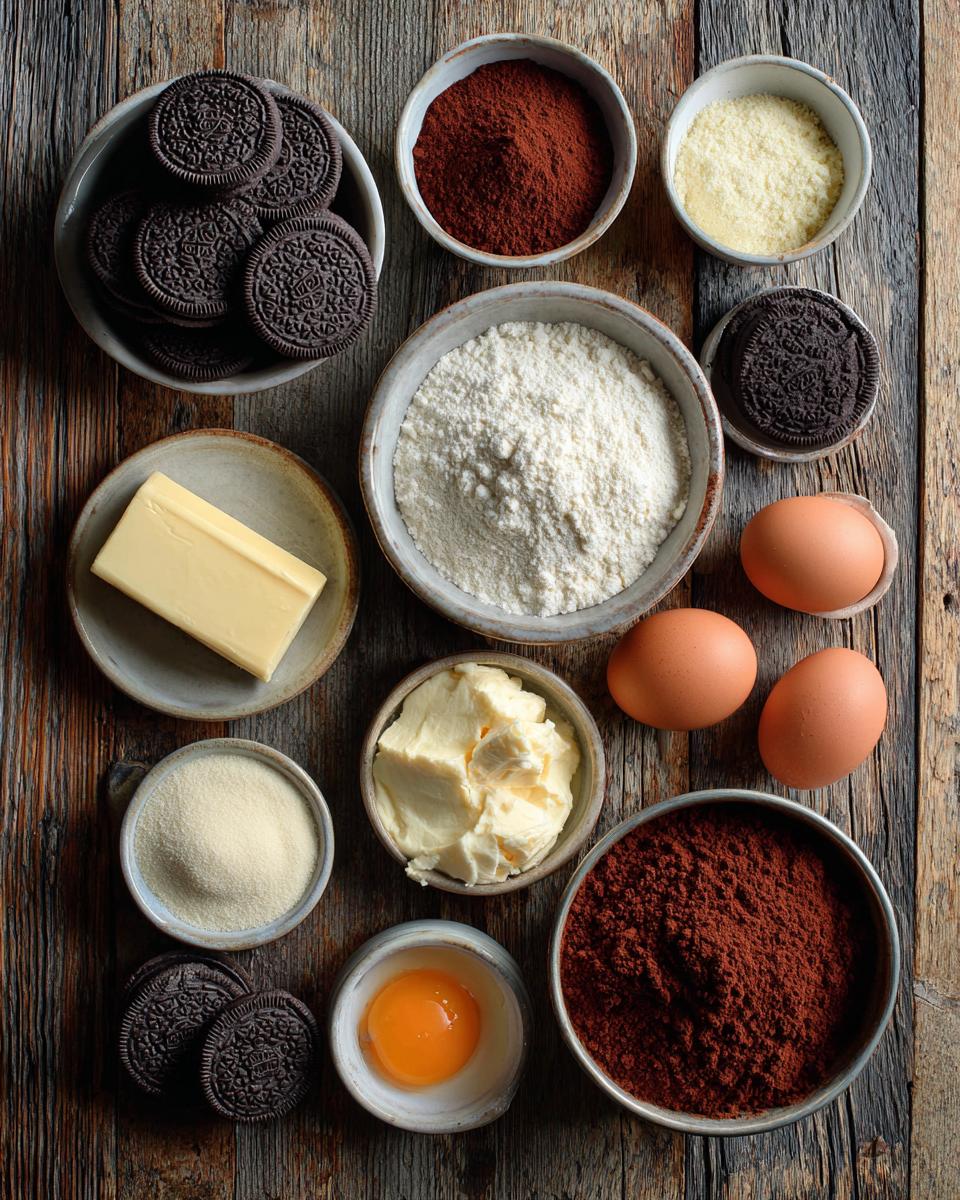
Ingredients for Red Velvet Oreo Cheesecake Perfection
Alright, my friends, it’s time to gather our treasures for this Red Velvet Oreo Cheesecake adventure! Just like any good recipe, the quality of your ingredients really shines through here. Don’t skimp on the good stuff, especially the cream cheese – it’s the heart of our cheesecake! Make sure everything that needs to be softened is out on the counter well ahead of time. Trust me, cold cream cheese is the enemy of a smooth batter.
- 1 1/2 cups chocolate sandwich cookie crumbs (that’s about 18 cookies, finely crushed)
- 1/4 cup unsalted butter, melted
- 24 ounces cream cheese, softened (yes, 24! Go big or go home!)
- 1 1/4 cups granulated sugar
- 1/4 cup unsweetened cocoa powder
- 2 large eggs
- 1 tablespoon vanilla extract (alcohol-free, of course!)
- 1 teaspoon red food coloring (for that iconic red velvet hue!)
- 1/2 cup sour cream
- 1/2 cup heavy cream
- 8 ounces chocolate sandwich cookies, roughly chopped (these are for folding into the batter!)
- 8 ounces cream cheese, softened (for our glorious frosting)
- 1/2 cup unsalted butter, softened (for frosting)
- 4 cups powdered sugar
- 1 teaspoon vanilla extract (alcohol-free, for frosting)
- 2-3 tablespoons milk or heavy cream (for frosting, adjust as needed)
Key Components of Your Red Velvet Oreo Cheesecake
Each ingredient plays a starring role in our Red Velvet Oreo Cheesecake! The cream cheese and sour cream give us that signature creamy tang, while the cocoa powder and red food coloring bring the classic red velvet flavor and vibrant color. And those chopped chocolate sandwich cookies? They’re not just for crunch; they add another layer of rich chocolatey goodness that makes this cheesecake absolutely irresistible. It’s all about balance!
Crafting Your Red Velvet Oreo Cheesecake: Step-by-Step Instructions
Alright, my fellow home cooks, this is where the magic happens! Don’t be intimidated by cheesecake; I’m going to walk you through every single step to ensure your Red Velvet Oreo Cheesecake turns out absolutely perfect. Just take your time, follow these instructions, and you’ll be a cheesecake master in no time. We’re going to build this masterpiece layer by delicious layer, so let’s get started!
Preparing the Red Velvet Oreo Cheesecake Crust
First things first, preheat your oven to 325°F (160°C). Grab that 9-inch springform pan and give it a light grease – we want that baby to release perfectly! In a medium bowl, combine your chocolate sandwich cookie crumbs with the melted butter. Mix it really well until it looks like wet sand. Now, press that mixture firmly into the bottom of your prepared pan. Use the back of a spoon or your clean hands to get it nice and compact. Bake this for just 10 minutes, then take it out and let it cool completely. Patience, my friend, patience!
Mixing the Red Velvet Oreo Cheesecake Batter
Now for the star of the show! In a large bowl, beat your softened cream cheese and granulated sugar together until it’s super smooth and creamy – no lumps allowed! Add in that cocoa powder and mix it until it’s fully combined and gorgeous. Next, beat in your eggs, one at a time, making sure each one is fully incorporated before adding the next. Don’t overmix here, okay? Just until combined. Stir in your vanilla extract and red food coloring until you get that beautiful, uniform red velvet hue. Finally, gently fold in the sour cream and heavy cream, just until combined. And for the grand finale, gently fold in those roughly chopped chocolate sandwich cookies. Oh my goodness, it’s going to be divine!
Baking and Cooling Your Red Velvet Oreo Cheesecake
Pour your glorious cheesecake batter over the cooled crust in your springform pan. Pop it into that preheated oven and bake for 60-70 minutes. You’re looking for the edges to be set, but the center should still have a slight jiggle when you gently shake the pan. Don’t worry, that jiggle means it’s perfect! Once it’s done, turn off the oven, crack the door open a few inches, and let the cheesecake cool in there for 1 hour. This slow cooling helps prevent cracks. After an hour, take it out and let it cool completely on a wire rack. Then, the hardest part: refrigerate for at least 4 hours, or even better, overnight! It’s so worth the wait.
Frosting Your Red Velvet Oreo Cheesecake
Once your cheesecake is perfectly chilled, it’s frosting time! In a large bowl, beat your softened cream cheese and butter until they’re light and fluffy. Gradually add in the powdered sugar, beating until everything is super smooth. Stir in the vanilla extract and then add the milk or heavy cream, a tablespoon at a time, until you get your desired consistency – not too thick, not too thin, just perfect for spreading. Spread that luscious frosting evenly over your chilled Red Velvet Oreo Cheesecake. Now, serve it up and bask in the glory!
Expert Tips for a Flawless Red Velvet Oreo Cheesecake
Okay, so you’ve got the steps down, but let me share a few of my personal secrets for making sure your Red Velvet Oreo Cheesecake isn’t just good, but absolutely *flawless* every single time. These are the little things I’ve picked up along the way that make all the difference, trust me. We want that perfect creamy texture and no dreaded cracks!
Ensuring Success with Your Red Velvet Oreo Cheesecake
First, always, always use room temperature ingredients for your cheesecake batter – especially the cream cheese and eggs. This helps everything blend super smoothly without lumps. Don’t overmix the batter once the eggs go in; overmixing adds too much air, which can lead to cracks. And for those cracks, avoid opening the oven door too much during baking, and definitely use that slow cool-down method I mentioned. It’s a game-changer!
Frequently Asked Questions About Red Velvet Oreo Cheesecake
I get a lot of questions about this Red Velvet Oreo Cheesecake, and I’m always happy to share my wisdom! It’s such a popular dessert, so it makes sense that folks want to get it just right. Here are some of the most common things I hear, along with my best advice:
Can I make Red Velvet Oreo Cheesecake ahead of time?
Absolutely, 100% yes! In fact, I highly recommend making your Red Velvet Oreo Cheesecake at least a day ahead. It really gives all those amazing flavors a chance to meld together and deepens that rich red velvet taste. Plus, it makes serving so much less stressful on the day you need it. Just make sure it’s completely chilled before you slice it. You can store it, covered, in the fridge for up to 5 days. It’s a fantastic make-ahead dessert!
How do I prevent cracks in my Red Velvet Oreo Cheesecake?
Ah, the dreaded cheesecake crack! Don’t worry, it happens to the best of us. The key is gentle handling and a slow, even cool-down. First, make sure your ingredients are at room temperature so you don’t have to overmix the batter. Overmixing adds too much air, which expands and then contracts, causing cracks. Second, don’t open the oven door too often during baking – resist the urge to peek! And finally, that slow cooling process I mentioned (leaving it in the turned-off oven with the door ajar) is your best friend. It helps the cheesecake adjust to the temperature change gradually.
What are good substitutions for ingredients in Red Velvet Oreo Cheesecake?
While I always stick to the original for my Red Velvet Oreo Cheesecake, I know sometimes you need to get creative! If you don’t have chocolate sandwich cookies, you could use plain chocolate wafers for the crust, or even a classic graham cracker crust. For the red food coloring, you can actually use beet powder for a more natural approach, though the color might be a bit more muted. As for the sour cream, full-fat plain yogurt can work in a pinch for that tangy kick, but the texture might be slightly different. Just remember, full-fat cream cheese is non-negotiable for that perfectly creamy texture!
Storing and Serving Your Red Velvet Oreo Cheesecake
Once you’ve made this incredible Red Velvet Oreo Cheesecake, you’ll want to make sure it stays perfect for as long as possible! Trust me, a little care goes a long way in keeping that creamy texture and vibrant flavor. And when it comes to serving, there are a couple of little tricks I use to make sure every slice is absolute perfection. Let’s make sure none of that hard work goes to waste, okay?
Keeping Your Red Velvet Oreo Cheesecake Fresh
To keep your Red Velvet Oreo Cheesecake at its best, always store it in an airtight container in the refrigerator. It’ll stay fresh and delicious for up to 5 days. I usually cover it with plastic wrap directly on the cheesecake surface before putting on the lid, just for extra protection!
Estimated Nutritional Information for Red Velvet Oreo Cheesecake
Just a heads up, this Red Velvet Oreo Cheesecake is definitely an indulgence, and that’s okay! Based on our recipe, each slice (for 12 servings) is estimated to be around 650 calories, with about 45g of fat, 60g of carbohydrates, and 8g of protein. Remember, these are estimates, and actual values can vary depending on the specific brands and ingredients you use!
Your Red Velvet Oreo Cheesecake Awaits!
So there you have it, my friends! Your very own, absolutely stunning Red Velvet Oreo Cheesecake. I’ve poured all my favorite tips and tricks into this, and now it’s your turn to shine in the kitchen. Go on, give it a try! I can’t wait to hear all about your cheesecake adventures. Come back and tell me how it went, or even better, rate the recipe! Happy baking!
PrintRed Velvet Oreo Cheesecake Recipe

Indulge in a rich Red Velvet Oreo Cheesecake, a decadent dessert featuring a chocolate cookie crust, creamy red velvet cheesecake, and a luscious cream cheese frosting, perfect for any celebration.
- Prep Time: 45 minutes
- Cook Time: 70 minutes
- Total Time: 12 hours 55 minutes
- Yield: 12 servings 1x
- Category: Dessert
- Method: Baking
- Cuisine: American
- Diet: Vegetarian
Ingredients
- 1 1/2 cups chocolate sandwich cookie crumbs (about 18 cookies)
- 1/4 cup unsalted butter, melted
- 24 ounces cream cheese, softened
- 1 1/4 cups granulated sugar
- 1/4 cup unsweetened cocoa powder
- 2 large eggs
- 1 tablespoon vanilla extract
- 1 teaspoon red food coloring
- 1/2 cup sour cream
- 1/2 cup heavy cream
- 8 ounces chocolate sandwich cookies, roughly chopped
- 8 ounces cream cheese, softened (for frosting)
- 1/2 cup unsalted butter, softened (for frosting)
- 4 cups powdered sugar
- 1 teaspoon vanilla extract (for frosting)
- 2–3 tablespoons milk or heavy cream (for frosting)
Instructions
- Preheat oven to 325°F (160°C). Lightly grease a 9-inch springform pan.
- In a medium bowl, combine cookie crumbs and melted butter. Press mixture firmly into the bottom of the prepared springform pan. Bake for 10 minutes. Remove from oven and let cool.
- In a large bowl, beat softened cream cheese and granulated sugar until smooth.
- Add cocoa powder and mix until fully combined.
- Beat in eggs one at a time, mixing well after each addition.
- Stir in vanilla extract and red food coloring until the color is uniform.
- Fold in sour cream and heavy cream until just combined.
- Gently fold in the chopped chocolate sandwich cookies.
- Pour cheesecake batter over the cooled crust.
- Bake for 60-70 minutes, or until the edges are set and the center jiggles slightly when gently shaken.
- Turn off the oven, crack the door open, and let the cheesecake cool in the oven for 1 hour.
- Remove from oven and cool completely on a wire rack. Refrigerate for at least 4 hours, or preferably overnight, before frosting.
- To make the frosting: In a large bowl, beat softened cream cheese and butter until light and fluffy.
- Gradually add powdered sugar, beating until smooth.
- Stir in vanilla extract and milk/heavy cream, adding more if needed to reach desired consistency.
- Spread frosting evenly over the chilled cheesecake.
- Serve chilled and enjoy!
Notes
- For best results, use full-fat cream cheese.
- Ensure all dairy ingredients are at room temperature for a smooth cheesecake batter and frosting.
- Do not overmix the cheesecake batter once the eggs are added; this can lead to cracks.
- To prevent cracking, avoid opening the oven door frequently during baking.
- Leftover cheesecake can be stored in an airtight container in the refrigerator for up to 5 days.
Nutrition
- Serving Size: 1 slice
- Calories: 650
- Sugar: 70g
- Sodium: 350mg
- Fat: 45g
- Saturated Fat: 25g
- Unsaturated Fat: 15g
- Trans Fat: 1g
- Carbohydrates: 60g
- Fiber: 2g
- Protein: 8g
- Cholesterol: 120mg