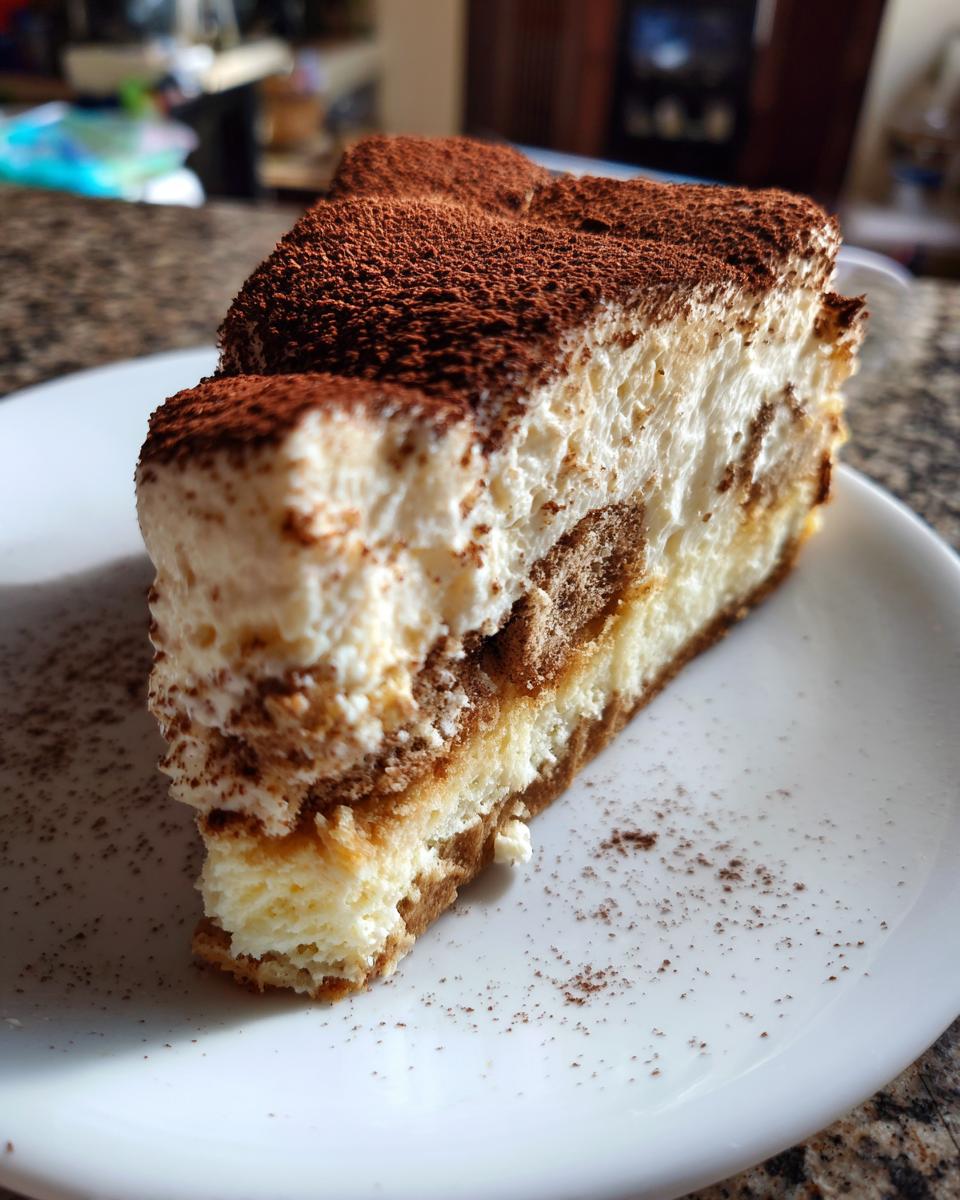
Oh my goodness, friend! You are in for such a treat. I’ve been dreaming of this moment, finally sharing my absolute favorite dessert mash-up with you. Imagine taking the rich, dreamy vibes of classic tiramisu and blending it with the creamy, tangy perfection of cheesecake. Sounds almost too good to be true, right? Well, it’s not! This, my dears, is my **Luxurious Tiramisu Cheesecake**, and it’s truly the best of both worlds. I mean, seriously, who could choose between those two iconic desserts? Not me! So, I figured, why not have both? It’s a showstopper, a crowd-pleaser, and honestly, a little piece of heaven on a plate. Get ready to fall in love!
Why You’ll Adore This Luxurious Tiramisu Cheesecake
Honestly, what’s not to adore? This isn’t just a dessert; it’s an experience! You’ll absolutely love it because:
- It’s got that incredible coffee-infused creaminess that just melts in your mouth.
- The layers of flavor are out of this world – sweet, a little tangy, and perfectly rich.
- It looks super fancy, but it’s surprisingly straightforward to make. Trust me!
- Every bite is a delightful surprise, combining two beloved classics effortlessly.
The Ultimate Dessert Fusion: Luxurious Tiramisu Cheesecake
This isn’t just throwing two desserts together; it’s a harmonious marriage! The zesty, smooth cheesecake base perfectly balances the bold coffee and delicate ladyfingers of tiramisu. It’s a symphony of textures and tastes, where each element shines while still creating something entirely new and utterly delicious. It’s truly genius, if I do say so myself!
Gathering Your Ingredients for Luxurious Tiramisu Cheesecake
Alright, let’s get down to business! Before we start our cheesecake adventure, you’ll want to gather everything you need. Trust me, having all your ingredients measured and ready to go makes the whole process so much smoother and more enjoyable. Here’s what you’ll need to create this amazing Luxurious Tiramisu Cheesecake. Make sure your cream cheese and mascarpone are lovely and soft, and that coffee is nice and cool!
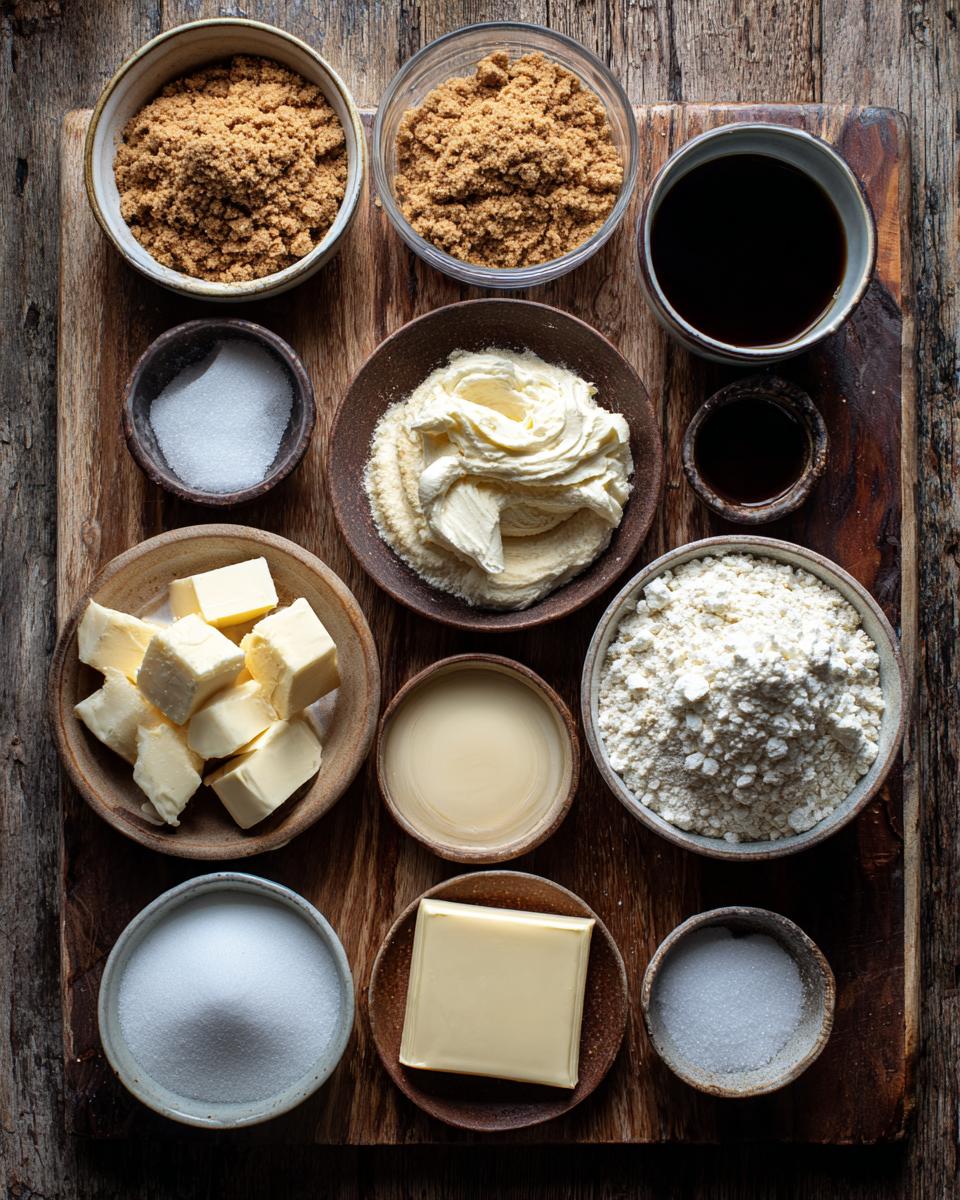
- 1 1/2 cups (180g) graham cracker crumbs
- 1/4 cup (50g) granulated sugar
- 1/2 cup (113g) unsalted butter, melted
- 24 ounces (680g) cream cheese, softened
- 1 cup (200g) granulated sugar
- 1/4 cup (60ml) strong brewed coffee, cooled
- 2 tablespoons (30ml) coffee liqueur (alcohol-free) or vanilla extract
- 1 teaspoon (5ml) vanilla extract
- 3 large eggs
- 1 cup (240g) mascarpone cheese, softened
- 1/4 cup (60ml) strong brewed coffee, for dipping
- 1 tablespoon (15g) granulated sugar, for dipping
- 12-15 ladyfingers
- 2 tablespoons (15g) unsweetened cocoa powder, for dusting
Essential Equipment for Your Luxurious Tiramisu Cheesecake
Okay, before we get our hands messy with all that creamy goodness, let’s make sure our kitchen is ready for action! Having the right tools makes all the difference, especially when you’re aiming for cheesecake perfection. Here’s what you’ll need to whip up this amazing Luxurious Tiramisu Cheesecake:
- 9-inch springform pan (super important for that clean release!)
- Large mixing bowls (you’ll need a couple!)
- Electric mixer (handheld or stand mixer works great)
- Rubber spatula or spoon
- Large roasting pan (for the water bath – don’t skip this!)
- Wire rack (for cooling)
- Shallow dish (for dipping those ladyfingers)
- Fine-mesh sieve (for dusting cocoa)
Crafting Your Luxurious Tiramisu Cheesecake: Step-by-Step Guide
Alright, my friend, this is where the magic truly happens! Don’t be intimidated by cheesecake; it’s honestly more about patience and following a few simple steps. I’m going to guide you through making this incredible Luxurious Tiramisu Cheesecake, from that perfect crumbly base to the dreamy, creamy topping. Just take it one step at a time, and you’ll have a masterpiece!
Preparing the Crust for Your Luxurious Tiramisu Cheesecake
First things first, let’s get that oven preheating to 325°F (160°C). Grab your 9-inch springform pan and give it a light grease. Now, in a bowl, mix your graham cracker crumbs, that first bit of sugar, and your melted butter. Press it firmly into the bottom of the pan – I use the bottom of a glass to get it super even. Bake this golden crust for just 10 minutes, then let it cool a bit while we work on the filling.
Assembling the Creamy Luxurious Tiramisu Cheesecake Filling
This is the heart of our Luxurious Tiramisu Cheesecake! In a big bowl, beat your softened cream cheese with the second cup of sugar until it’s wonderfully smooth and creamy. Next, whisk in the cooled coffee, the alcohol-free coffee liqueur (or extra vanilla!), and the vanilla extract. Keep beating until everything is beautifully combined. Now, for the eggs: add them one at a time, beating just until each is mixed in. Seriously, *just* combined! Overmixing here can lead to cracks, and we don’t want those! Finally, gently fold in that lovely softened mascarpone cheese until it’s just incorporated. We want creamy, not airy.
Baking and Cooling Your Luxurious Tiramisu Cheesecake
Pour that gorgeous, creamy batter over your cooled crust in the springform pan. Now, for the secret weapon against cracks: the water bath! Place your springform pan into a larger roasting pan. Carefully pour hot water into the roasting pan, making sure it comes about halfway up the sides of your cheesecake pan. Pop it in the oven for 60-70 minutes, or until the edges are set but the center still has a slight jiggle. Turn off the oven, crack the door open, and let your cheesecake chill in there for an hour. This gradual cooling is key! Then, take it out of the water bath and let it cool completely on a wire rack before refrigerating for at least 4 hours, or even better, overnight!
The Finishing Touches: Ladyfingers and Cocoa for Your Luxurious Tiramisu Cheesecake
Once your cheesecake is perfectly chilled, it’s time for the signature tiramisu flair! In a shallow dish, mix the last bit of strong coffee with the dipping sugar. Take each ladyfinger and *briefly* dip it into the coffee mixture – we want it moist, not soggy! Arrange these coffee-kissed ladyfingers over the top of your chilled cheesecake. Finally, grab your unsweetened cocoa powder and a fine-mesh sieve, and dust generously over the ladyfingers and the entire top of the cake. Voila! Your Luxurious Tiramisu Cheesecake is ready to impress!
Tips for a Flawless Luxurious Tiramisu Cheesecake
Okay, you’ve got the steps down, but let me share a few of my personal secrets for making sure your Luxurious Tiramisu Cheesecake turns out absolutely perfect every single time. These little nuggets of wisdom will elevate your dessert from “good” to “OMG, you HAVE to try this!”
- Room Temperature is Your Best Friend: Seriously, this is non-negotiable for cheesecake. Make sure your cream cheese, mascarpone, and even your eggs are at room temperature. It helps everything blend super smoothly, preventing lumps and ensuring a beautifully creamy batter.
- Don’t Be an Over-Mixer: Once those eggs go in, mix just enough to combine. Overmixing adds too much air, which can cause your cheesecake to puff up in the oven and then tragically crack as it cools. We want smooth, not airy!
- The Gentle Chill: Don’t rush the cooling process. That hour in the oven with the door ajar, followed by complete cooling on the wire rack, and then the long chill in the fridge – it’s all crucial! This gradual cooling prevents those dreaded cracks and lets the cheesecake set up beautifully.
- Patience with Ladyfingers: When dipping the ladyfingers, be quick! A quick dip is all you need to get that coffee flavor without making them soggy.
Frequently Asked Questions About Luxurious Tiramisu Cheesecake
I know you probably have a few questions swirling around in your head, especially if this is your first time making a cheesecake, let alone a Luxurious Tiramisu Cheesecake! Don’t you worry, I’ve got you covered. Here are some of the most common questions I get asked about this showstopper dessert:
Can I Prepare Luxurious Tiramisu Cheesecake in Advance?
Absolutely! In fact, I highly recommend it. This Luxurious Tiramisu Cheesecake is even better the next day once all those amazing flavors have had a chance to meld and deepen. Just cover it well and keep it in the fridge overnight!
Substitutions for Coffee Liqueur in Luxurious Tiramisu Cheesecake
Great question! If you want to keep it alcohol-free, you can totally just use extra vanilla extract. Or, for a little something different, a tiny splash of almond extract can be lovely, too! The recipe already calls for alcohol-free coffee liqueur, so you’re already set there!
Troubleshooting: Preventing Cracks in Your Luxurious Tiramisu Cheesecake
Cracks are the bane of every cheesecake baker’s existence, right? The best ways to prevent them in your Luxurious Tiramisu Cheesecake are to make sure your ingredients are at room temperature, never overmix the batter (especially after adding eggs!), and always use that water bath. Also, let it cool slowly in the turned-off oven – that gradual temperature change is super important!
Serving and Storage for Your Luxurious Tiramisu Cheesecake
Once your Luxurious Tiramisu Cheesecake is perfectly chilled and dusted with cocoa, it’s ready to dazzle! To serve, simply run a thin, sharp knife under hot water, wipe it clean, and make your slices. Reheat the knife between each cut for the cleanest edges – it makes all the difference! Any leftovers (if there are any, wink wink!) should be stored in an airtight container in the refrigerator. It’ll stay absolutely delicious for up to 4 days, though I doubt it will last that long!
Estimated Nutritional Information
Just a quick heads-up, my friend! While I’ve included some nutritional estimates here for you (because I know some of you like to keep an eye on these things!), please remember that these are just that – estimates! The actual values for your Luxurious Tiramisu Cheesecake can totally vary depending on the specific brands of ingredients you use, how big you cut your slices (no judgment here, we all have those days!), and even the exact preparation methods. So, take these numbers with a grain of salt and enjoy every delicious bite!
PrintTiramisu Cheesecake Recipe
Experience the best of both worlds with this luxurious Tiramisu Cheesecake. A creamy cheesecake base infused with coffee and mascarpone, topped with cocoa and ladyfingers, offering a delightful twist on a classic dessert.
- Prep Time: 45 minutes
- Cook Time: 70 minutes
- Total Time: 5 hours 55 minutes
- Yield: 12 servings 1x
- Category: Dessert
- Method: Baking
- Cuisine: Italian-American
- Diet: Vegetarian
Ingredients
- 1 1/2 cups (180g) graham cracker crumbs
- 1/4 cup (50g) granulated sugar
- 1/2 cup (113g) unsalted butter, melted
- 24 ounces (680g) cream cheese, softened
- 1 cup (200g) granulated sugar
- 1/4 cup (60ml) strong brewed coffee, cooled
- 2 tablespoons (30ml) coffee liqueur (alcohol-free) or vanilla extract
- 1 teaspoon (5ml) vanilla extract
- 3 large eggs
- 1 cup (240g) mascarpone cheese, softened
- 1/4 cup (60ml) strong brewed coffee, for dipping
- 1 tablespoon (15g) granulated sugar, for dipping
- 12–15 ladyfingers
- 2 tablespoons (15g) unsweetened cocoa powder, for dusting
Instructions
- Preheat oven to 325°F (160°C). Lightly grease a 9-inch springform pan.
- In a medium bowl, combine graham cracker crumbs, 1/4 cup sugar, and melted butter. Press mixture evenly into the bottom of the prepared springform pan.
- Bake crust for 10 minutes. Remove from oven and let cool slightly.
- In a large bowl, beat softened cream cheese and 1 cup sugar until smooth and creamy.
- Beat in 1/4 cup cooled coffee, coffee liqueur (or vanilla extract), and vanilla extract until well combined.
- Add eggs one at a time, beating just until incorporated after each addition. Do not overmix.
- Gently fold in the softened mascarpone cheese until just combined.
- Pour the cheesecake batter over the cooled crust in the springform pan.
- Place the springform pan in a larger roasting pan. Pour hot water into the roasting pan to come halfway up the sides of the springform pan.
- Bake for 60-70 minutes, or until the edges are set and the center jiggles slightly.
- Turn off the oven and leave the cheesecake in the oven with the door ajar for 1 hour.
- Remove from oven and water bath. Let cool completely on a wire rack.
- Cover and refrigerate for at least 4 hours, or preferably overnight.
- In a shallow dish, combine 1/4 cup coffee and 1 tablespoon sugar. Briefly dip each ladyfinger into the coffee mixture, being careful not to over-saturate.
- Arrange the dipped ladyfingers over the chilled cheesecake.
- Dust generously with unsweetened cocoa powder before serving.
Notes
- Ensure all dairy ingredients are at room temperature for a smooth cheesecake batter.
- Do not overmix the cheesecake batter once the eggs are added; this can lead to cracks.
- A water bath helps to prevent cracks in the cheesecake and ensures even baking.
- For a stronger coffee flavor, use espresso.
- Store leftover cheesecake in an airtight container in the refrigerator for up to 4 days.
Nutrition
- Serving Size: 1 slice
- Calories: 450
- Sugar: 35g
- Sodium: 220mg
- Fat: 30g
- Saturated Fat: 18g
- Unsaturated Fat: 8g
- Trans Fat: 0.5g
- Carbohydrates: 40g
- Fiber: 1g
- Protein: 7g
- Cholesterol: 150mg