Oh my goodness, friend, if you’re looking for a dessert that’s going to make everyone at your table gasp with delight, you HAVE to try this Banana Pudding Cheesecake! It’s not just a dessert; it’s an experience, a delightful mash-up of two absolute classics that just *belong* together. Imagine the creamy, dreamy texture of your favorite cheesecake, but then BAM! You get that nostalgic, comforting flavor of banana pudding, all nestled in a crunchy Nilla wafer crust. Trust me, it’s a game-changer. I first whipped this up for a family potluck, and it disappeared faster than I could say “seconds!” It’s become my go-to for making smiles happen, and I just know you’re going to adore it too.
Why You’ll Love This Banana Pudding Cheesecake
Seriously, this isn’t just *another* cheesecake recipe. This is the one that’ll have your friends begging for the recipe and your family fighting over the last slice! It’s got everything you could ever want in a dessert: incredible flavor, a perfect texture, and it’s surprisingly simple to pull off. Get ready to be everyone’s favorite baker!
The Irresistible Creaminess of Banana Pudding Cheesecake
Oh, the texture! It’s like a cloud got together with a dream. This banana pudding cheesecake is so unbelievably smooth and rich, melting in your mouth with every bite. The banana flavor is perfectly balanced, not too overpowering, just pure, comforting deliciousness that sings on your palate.
Easy to Follow Banana Pudding Cheesecake Recipe
Don’t let the fancy name fool you; this banana pudding cheesecake recipe is totally approachable! I’ve broken it down into super clear, straightforward steps, so even if you’re new to cheesecakes, you’ll be a pro in no time. No complicated techniques, just pure baking joy!
Essential Equipment for Your Banana Pudding Cheesecake
Okay, before we dive into the deliciousness, let’s talk tools! You don’t need a professional kitchen, but having the right equipment makes this banana pudding cheesecake a breeze. These few essentials will ensure your cheesecake turns out perfectly smooth and beautiful, just like it should.
Key Baking Tools for Banana Pudding Cheesecake
You’ll definitely want a trusty springform pan for that perfect release, and an electric mixer is your best friend for getting that cheesecake filling super smooth. A good mixing bowl and a spatula will round out your must-haves!
Ingredients for the Perfect Banana Pudding Cheesecake
Alright, my baking buddy, let’s talk ingredients! This banana pudding cheesecake might sound fancy, but it uses everyday items you probably already have or can easily grab from the store. The secret, as always, is in the quality and how you treat them. We’re aiming for pure banana-cheesecake bliss here, so let’s make sure we’ve got everything just right!
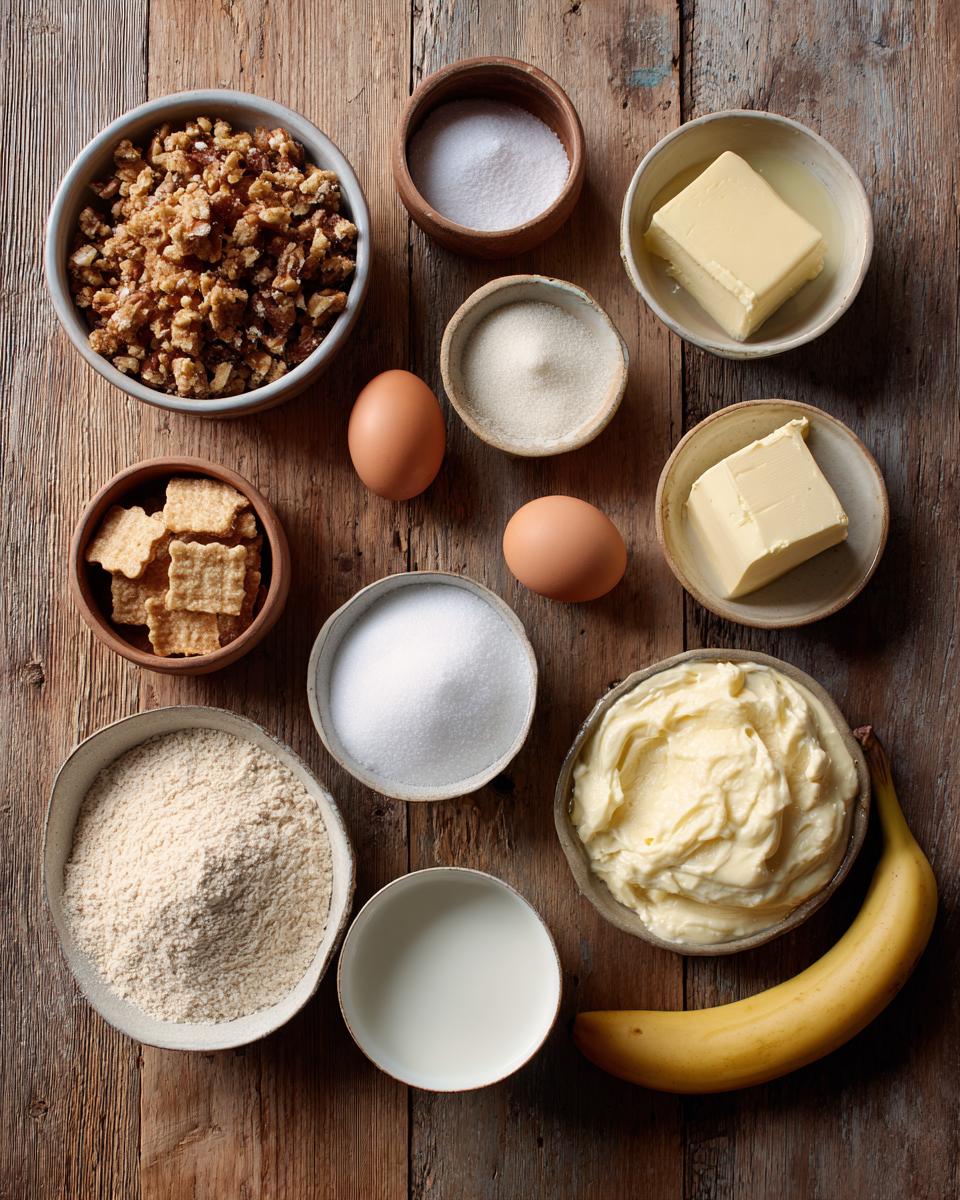
Unambiguous Ingredients for Banana Pudding Cheesecake
First up, those Nilla wafers! We need 1½ cups of crumbs, which is usually about 40 wafers. And for the cream cheese, make sure it’s three 8-ounce packages, fully softened to room temperature – this is CRUCIAL for a smooth filling! For the eggs, we’re talking large eggs, not medium or jumbo. Oh, and those mashed bananas for the filling? About one medium ripe banana should do the trick, no green ones please!
How to Make Your Delicious Banana Pudding Cheesecake
Okay, deep breaths! We’re about to make some magic happen. Don’t let the steps intimidate you; I’ve laid it all out so clearly. This whole process is actually really fun, and the reward at the end? Oh, it’s so worth it. Just follow along, and you’ll have a show-stopping banana pudding cheesecake that everyone will rave about. Let’s get baking!
Crafting the Nilla Wafer Crust for Banana Pudding Cheesecake
First things first, preheat that oven to a cozy 350°F (175°C)! Grab your springform pan and give it a light grease. Now, in a bowl, mix those Nilla wafer crumbs with the sugar and melted butter until it looks like wet sand. Press it *firmly* into the bottom of your pan – I use the bottom of a glass for this. Bake for just 10 minutes, then pull it out and let it cool a bit. Don’t forget to drop your oven temp to 325°F (160°C) for the next step!
Preparing the Creamy Banana Pudding Cheesecake Filling
This is where the creamy dream begins! In a big bowl, get your softened cream cheese and that one cup of sugar. Beat them with your electric mixer until they’re super smooth and fluffy – no lumps allowed! Now, add your eggs, but *one at a time*, mixing just until each is combined before adding the next. This prevents overmixing, which can lead to cracks, and we don’t want those! Stir in the vanilla extract, your mashed bananas, sour cream, and the quarter cup of heavy cream. Mix *just* until everything is combined. Seriously, don’t overdo it, or your cheesecake might get tough. We want tender, lusciousness!
Baking and Chilling Your Banana Pudding Cheesecake
Pour that glorious filling over your cooled Nilla wafer crust. Pop it into your preheated 325°F (160°C) oven for about 50-60 minutes. You’re looking for the edges to be set, but the center should still have a little jiggle when you gently shake the pan – that’s perfect! Once it reaches that point, turn off the oven, crack the door open, and let it chill out in there for a whole hour. This gentle cool-down prevents cracking! Then, take it out, let it cool completely on a wire rack, cover it up, and tuck it into the fridge for at least 4 hours, or even better, overnight. Patience is key here, my friend!
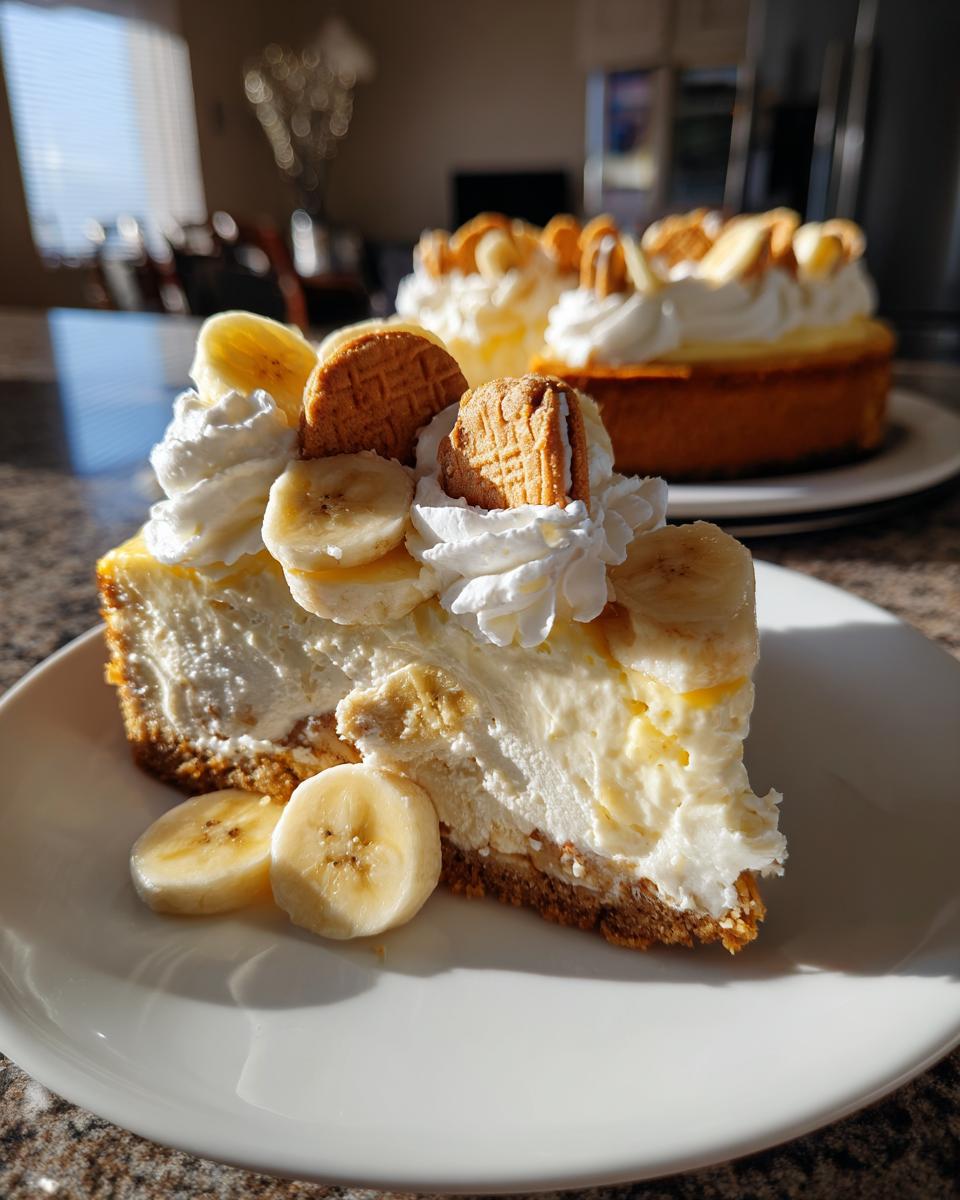
Topping Your Banana Pudding Cheesecake to Perfection
Alright, it’s topping time! Grab a super cold bowl and your electric mixer. Pour in the heavy cream, powdered sugar, and that half-teaspoon of vanilla extract. Beat it until you get beautiful, stiff peaks – you want that whipped cream to hold its shape! Now, for the grand finale: right before you serve, arrange your freshly sliced bananas all over the top of the chilled cheesecake. Then, spread or pipe that luscious whipped cream over the bananas. And because we love a good crunch, don’t forget to scatter some extra Nilla wafers on top for that classic banana pudding vibe. Ta-da! Pure perfection!
Tips for Success with Your Banana Pudding Cheesecake
Alright, so you’ve got the basics down, but I’ve got a few extra nuggets of wisdom for you to make sure your banana pudding cheesecake isn’t just good, but absolutely legendary! These little tricks are what take it from a nice dessert to a “Wow, did *you* make this?!” kind of masterpiece. Trust me, they make all the difference.
Achieving the Best Banana Pudding Cheesecake Texture
Okay, two big things here: temperature and mixing! Always, always make sure your cream cheese is at room temperature. It creams so much smoother that way. And please, for the love of all things delicious, don’t overmix! Mix just until combined, especially after adding the eggs. This keeps it perfectly smooth and helps prevent those annoying cracks.
Banana Pudding Cheesecake: Serving and Storage
You’ve poured your heart into this banana pudding cheesecake, and now it’s time to enjoy it! But before you dive in, let’s talk about making it shine even brighter and, just as importantly, how to keep those precious leftovers tasting amazing. Because trust me, you’ll want to savor every last bite!
Creative Serving Suggestions for Banana Pudding Cheesecake
This banana pudding cheesecake is a star on its own, but a drizzle of caramel sauce or a sprinkle of toasted pecans takes it to another level! A dollop of extra whipped cream never hurts either. It’s also fantastic with a warm cup of coffee or a cold glass of milk.
Storing Leftover Banana Pudding Cheesecake
If there’s any left (a big “if”!), simply cover your banana pudding cheesecake tightly with plastic wrap and pop it back in the fridge. It’ll stay fresh and delicious for 3-4 days. Just keep those bananas covered to prevent browning!
Frequently Asked Questions About Banana Pudding Cheesecake
Okay, I know you might have a few burning questions about this glorious banana pudding cheesecake, and I’m here to spill all the secrets! It’s totally normal to wonder about things like making it ahead or what kind of bananas work best. Let’s get these common questions answered so you can confidently bake your best banana pudding cheesecake ever!
Can I make Banana Pudding Cheesecake ahead of time?
Absolutely, yes! In fact, I highly recommend it. This banana pudding cheesecake actually tastes even better the next day once all those amazing flavors have had a chance to meld together in the fridge. You can assemble and bake the whole cheesecake a day or two in advance. Just hold off on adding the fresh banana slices and whipped cream topping until right before you’re ready to serve, to keep everything looking and tasting its best.
Why did my Banana Pudding Cheesecake crack?
Oh, the dreaded cheesecake crack! Don’t worry, it happens to the best of us. The most common culprits for a cracked banana pudding cheesecake are overmixing the batter (which incorporates too much air) or a sudden temperature change during baking or cooling. That’s why I stress letting it cool gradually in the turned-off oven with the door ajar. Also, ensure your cream cheese is super soft before you start!
What kind of bananas are best for Banana Pudding Cheesecake?
For the filling, you want nice, ripe bananas – think yellow with a few brown spots, so they’re sweet and mash easily. They’ll give that perfect banana pudding flavor to your cheesecake. For the topping, though, I prefer bananas that are just ripe, still firm, and mostly yellow. They hold their shape better and won’t get mushy as quickly, keeping your banana pudding cheesecake looking fresh and appealing!
Estimated Nutritional Information for Banana Pudding Cheesecake
Okay, for those of you who like to keep an eye on what you’re eating (or just get curious!), here’s a quick peek at the estimated nutritional info for a single serving of this banana pudding cheesecake. Remember, these are just estimates, and they can totally vary based on your exact ingredients and portion sizes. But it gives you a good idea!
PrintBanana Pudding Cheesecake
A delightful mashup of two classic desserts, this banana pudding cheesecake features a Nilla wafer crust, a creamy banana cheesecake filling, and a topping of fresh bananas, whipped cream, and more Nilla wafers.
- Prep Time: 30 minutes
- Cook Time: 60 minutes
- Total Time: 5 hours 30 minutes
- Yield: 12 servings 1x
- Category: Dessert
- Method: Baking
- Cuisine: American
- Diet: Vegetarian
Ingredients
- 1 1/2 cups Nilla wafer crumbs (about 40 wafers)
- 1/4 cup granulated sugar
- 1/2 cup unsalted butter, melted
- 3 (8 ounce) packages cream cheese, softened
- 1 cup granulated sugar
- 2 large eggs
- 1 teaspoon vanilla extract
- 1/2 cup mashed ripe bananas (about 1 medium banana)
- 1/4 cup sour cream
- 1/4 cup heavy cream
- 3 ripe bananas, sliced, for topping
- 1 cup heavy cream, for topping
- 2 tablespoons powdered sugar, for topping
- 1/2 teaspoon vanilla extract, for topping
- Additional Nilla wafers, for topping
Instructions
- Preheat oven to 350°F (175°C). Lightly grease a 9-inch springform pan.
- For the crust: In a medium bowl, combine Nilla wafer crumbs, 1/4 cup granulated sugar, and melted butter. Press mixture firmly into the bottom of the prepared springform pan. Bake for 10 minutes. Remove from oven and let cool slightly. Reduce oven temperature to 325°F (160°C).
- For the filling: In a large bowl, beat softened cream cheese and 1 cup granulated sugar with an electric mixer until smooth.
- Beat in eggs one at a time, mixing well after each addition. Stir in 1 teaspoon vanilla extract, mashed bananas, sour cream, and 1/4 cup heavy cream until just combined. Do not overmix.
- Pour the filling over the cooled crust.
- Bake for 50-60 minutes, or until the edges are set and the center jiggles slightly when gently shaken.
- Turn off the oven, crack the door open, and let the cheesecake cool in the oven for 1 hour.
- Remove the cheesecake from the oven and let it cool completely on a wire rack.
- Once cooled, cover and refrigerate for at least 4 hours, or preferably overnight.
- For the topping: In a cold bowl, beat 1 cup heavy cream, powdered sugar, and 1/2 teaspoon vanilla extract with an electric mixer until stiff peaks form.
- Before serving, arrange sliced bananas on top of the cheesecake. Spread or pipe whipped cream over the bananas. Garnish with additional Nilla wafers.
Notes
- Ensure cream cheese is at room temperature for a smooth filling.
- Do not overmix the cheesecake batter, as this can introduce too much air and cause cracks.
- Chilling the cheesecake for an extended period allows it to set properly and enhances its flavor.
Nutrition
- Serving Size: 1 slice
- Calories: 450
- Sugar: 40g
- Sodium: 250mg
- Fat: 30g
- Saturated Fat: 18g
- Unsaturated Fat: 8g
- Trans Fat: 0.5g
- Carbohydrates: 45g
- Fiber: 2g
- Protein: 7g
- Cholesterol: 120mg